


Hi,
I'm in the process of creating a controller definition and mapping for the Ableton Push 1. I have almost everything working well, but one thing I haven't got totally working is the mapping for the pad inputs. On the Push, the pads are represented as notes and emit velocity and aftertouch messages.
Firstly, what I can get working is treating the pads as simple binary (on/off) buttons using the following in the controller definition:
When I do this I can then map the button to the play_pause action (for example) and everything works great. Alternatively, I can treat the pad as a slider in the controller definition:
If I do this then I can see the button (slider) working correctly in the mapping editor - i.e. it correctly reports 0...1 depending on how much pressure is applied to the pad. Using sliders rather than buttons seems like a better way to define the pads since it gives more options for their use. The issue that I'm getting is that if I use sliders for the pads, then they only partially work for controlling things like play_pause, which expect an on/off state. Sometimes pressing the pad does the right thing, other times it does not. I can see this is because as the pad is just registering the press, or just registering the release, its value is oscillating between 0 and > 0. What it looks to me like needs to be done is to apply some sort of debounce approach via the VDJ script, but I don't know if this is possible? Given that the pads work when just treated as buttons in the controller definition, it looks to me like VDJ is internally applying some sort of debounce to them. And it's not when the pads are treated as sliders, which I think makes sense.
As it stands I can either:
Ideally, I'd like the controller definition to support using the pads both as buttons or as sliders rather than having to hard-code the behaviour in the controller definition. Does anyone know if this is possible or if there is a better way to map these pads?
Thanks!
Simon
I'm in the process of creating a controller definition and mapping for the Ableton Push 1. I have almost everything working well, but one thing I haven't got totally working is the mapping for the pad inputs. On the Push, the pads are represented as notes and emit velocity and aftertouch messages.
Firstly, what I can get working is treating the pads as simple binary (on/off) buttons using the following in the controller definition:
<button note="0x5C" name="BTN_PAD_LINE1_COL1" />
When I do this I can then map the button to the play_pause action (for example) and everything works great. Alternatively, I can treat the pad as a slider in the controller definition:
<slider aftertouch="0x5C" name="BTN_PAD_LINE1_COL1" nozero="no" ghost="no" />
If I do this then I can see the button (slider) working correctly in the mapping editor - i.e. it correctly reports 0...1 depending on how much pressure is applied to the pad. Using sliders rather than buttons seems like a better way to define the pads since it gives more options for their use. The issue that I'm getting is that if I use sliders for the pads, then they only partially work for controlling things like play_pause, which expect an on/off state. Sometimes pressing the pad does the right thing, other times it does not. I can see this is because as the pad is just registering the press, or just registering the release, its value is oscillating between 0 and > 0. What it looks to me like needs to be done is to apply some sort of debounce approach via the VDJ script, but I don't know if this is possible? Given that the pads work when just treated as buttons in the controller definition, it looks to me like VDJ is internally applying some sort of debounce to them. And it's not when the pads are treated as sliders, which I think makes sense.
As it stands I can either:
- Treat the pads as buttons, in which case they work perfectly as buttons, but I can't take advantage of the velocity of aftertouch.
- Treat the pads as sliders, in which case they work fine as sliders, but can't be used as normal buttons.
Ideally, I'd like the controller definition to support using the pads both as buttons or as sliders rather than having to hard-code the behaviour in the controller definition. Does anyone know if this is possible or if there is a better way to map these pads?
Thanks!
Simon
Posté Sun 12 Jul 20 @ 11:16 am
 djdad
djdad
First, it's a good practice to add channel="" to your keys. So, if for PAD in Line 1 , Col1 you get something like..
90 5C 7F on press and 90 5C 00 (or 80 5C 00) on release (so channel 0), you need to have..
About velocity, you said that button emits both velocity and after-touch ? So what exactly you get while press the button ?
Something like 90 5C xx when u press , where xx represents the initial pressure ?
In this case, you can add velocity="true" in the note of the pad.
Or if you dont intend to use Pads and pads pages you can split to ..
and let the user assign the 2 keys as he wants them.
For after-touch velocity you get something like A0 5C nn where nn varies depending on the continuous pressure ?
Best would be to give the after-touch velocity a different name (e.g. PAD1_ATVEL) and assign the pad as pad x and it's velocity as pad_pressure x (where x is the number of the pad)
For Pads and the default pages, you will get probably velocity working only in Sampler page (or in Sampler Velocity for Builds 6017 and later), but with custom pad pages, user will be able to provide the action he wants in Pad Editor and the Pressure tab.
90 5C 7F on press and 90 5C 00 (or 80 5C 00) on release (so channel 0), you need to have..
<button note="0x5C" name="BTN_PAD_LINE1_COL1" channel="0"/>
About velocity, you said that button emits both velocity and after-touch ? So what exactly you get while press the button ?
Something like 90 5C xx when u press , where xx represents the initial pressure ?
In this case, you can add velocity="true" in the note of the pad.
<button note="0x5C" name="BTN_PAD_LINE1_COL1" channel="0" velocity="true" />
Or if you dont intend to use Pads and pads pages you can split to ..
<button note="0x5C" name="BTN_PAD_LINE1_COL1"  channel="0"/>
<slider note="0x5C" name="BTN_PAD_LINE1_COL1_VEL"  channel="0" nozero="yes" ghost="no"/>
and let the user assign the 2 keys as he wants them.
For after-touch velocity you get something like A0 5C nn where nn varies depending on the continuous pressure ?
Best would be to give the after-touch velocity a different name (e.g. PAD1_ATVEL) and assign the pad as pad x and it's velocity as pad_pressure x (where x is the number of the pad)
For Pads and the default pages, you will get probably velocity working only in Sampler page (or in Sampler Velocity for Builds 6017 and later), but with custom pad pages, user will be able to provide the action he wants in Pad Editor and the Pressure tab.
Posté Sun 12 Jul 20 @ 1:00 pm
Thanks for the quick response and thanks for the tip on specifying the channel. I'll update the definition file to use it.
When I press one of the pads the below is a sample of the midi messages I receive:
Or in hex dump:
So yes, it's receiving the messages you indicate. And yes, at least some/half of the pads I was intending to use for the pads in the pad pages.
My thinking was that it made sense to use the aftertouch since the velocity is just the pressure at the instant the pad is hit and it would be more useful to be able to get a continuous pressure while the pad is pressed. To try to get it to work as a button and aftertouch, I did a similar trick that you mentioned of having two devices per pad - but in my case, I had one for the button and one for the aftertouch. This didn't work as I expect as it caused the aftertouch values to only start being reported after a delay. With only the aftertouch device for the pad, there was no delay.
I tried your suggestion of:
That worked and is probably the best behaviour I can get if I want to treat all the pads generically? I suspect having the aftertouch isn't that useful in most cases and I didn't have a specific need for it.
Thanks for the info. I presume once I've got a definition and mapping I'm happy with, I can make a post on the forum with a link to a github repo, in case it's useful for anyone else?
When I press one of the pads the below is a sample of the midi messages I receive:
Source  Event                  Ch  Data
 32:1   Note on                 0, note 92, velocity 4
 32:1   Polyphonic aftertouch   0, note 92, value 127
 32:1   Polyphonic aftertouch   0, note 92, value 103
 32:1   Polyphonic aftertouch   0, note 92, value 0
 32:1   Note off                0, note 92, velocity 0
Or in hex dump:
Debug [Controller]: Ableton Push MIDI 2: t:9354 ms status 0x90 (ch 1, opcode 0x9), ctrl 0x5C, val 0x0F
Debug [Controller]: Ableton Push MIDI 2: t:9435 ms status 0xA0 (ch 1, opcode 0xA), ctrl 0x5C, val 0x6F
Debug [Controller]: Ableton Push MIDI 2: t:9455 ms status 0xA0 (ch 1, opcode 0xA), ctrl 0x5C, val 0x7F
Debug [Controller]: Ableton Push MIDI 2: t:9577 ms status 0xA0 (ch 1, opcode 0xA), ctrl 0x5C, val 0x0F
Debug [Controller]: Ableton Push MIDI 2: t:9581 ms status 0xA0 (ch 1, opcode 0xA), ctrl 0x5C, val 0x00
Debug [Controller]: Ableton Push MIDI 2: t:9581 ms status 0x80 (ch 1, opcode 0x8), ctrl 0x5C, val 0x00
So yes, it's receiving the messages you indicate. And yes, at least some/half of the pads I was intending to use for the pads in the pad pages.
My thinking was that it made sense to use the aftertouch since the velocity is just the pressure at the instant the pad is hit and it would be more useful to be able to get a continuous pressure while the pad is pressed. To try to get it to work as a button and aftertouch, I did a similar trick that you mentioned of having two devices per pad - but in my case, I had one for the button and one for the aftertouch. This didn't work as I expect as it caused the aftertouch values to only start being reported after a delay. With only the aftertouch device for the pad, there was no delay.
I tried your suggestion of:
<button note="0x5C" name="BTN_PAD_LINE1_COL1" channel="0" velocity="true" />
That worked and is probably the best behaviour I can get if I want to treat all the pads generically? I suspect having the aftertouch isn't that useful in most cases and I didn't have a specific need for it.
Thanks for the info. I presume once I've got a definition and mapping I'm happy with, I can make a post on the forum with a link to a github repo, in case it's useful for anyone else?
Posté Sun 12 Jul 20 @ 2:07 pm
djdad
If you intend sharing the files with other members of the community, best would be to add after-touch velocity in your definition with some name="whatever_ATVEL" , and leave it un-assigned in your mapping , for others to use if wanted.
BTW, you figured out leds too ?
When done, you can upload to our Addons
BTW, you figured out leds too ?
When done, you can upload to our Addons
Posté Sun 12 Jul 20 @ 2:23 pm
Thanks for the info.
Yes, I've got the LEDs working as shown in this photo:
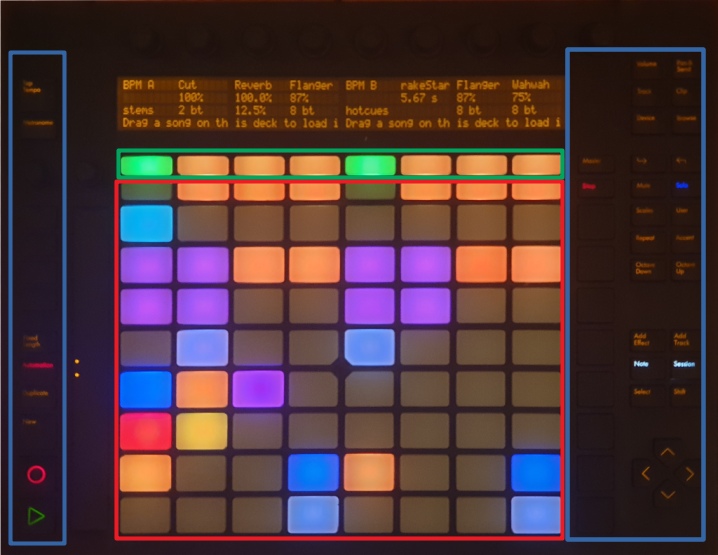
The Push 1 has buttons that have three types of LED for the buttons:
Yes, I've got the LEDs working as shown in this photo:
The Push 1 has buttons that have three types of LED for the buttons:
- The main pads (outlined in red) are RGB and there is a reasonable palette available. I used the <color> element for those. For simplicity, I have mapped all the named colors defined in the controller definition docs (e.g. magenta, red, dark red, etc). This doesn't give the full range of colors available for the device but I think it's more than enough for most cases.
This approach supports mapping the pads on the push to the automatic colors for the pads in VDJ by just assigning the LEDs to actions like "left pad_button color 1". e.g. in the photo, I have stems mode enabled and you can see that the pads mapped to the left deck pads have the right colors automatically for the stem pads (blue, orange and magenta first line, red, yellow second line). Note that I think that the Push can support flashing these LEDs itself but I don't have this setup and just rely on VDJ to do any blinking. Again by just assigning the LEDs to the actions like "left pad_button color 1" the blinking associated with the pads just works. - The top row of pads (outlined in green) are color too but only have a small palette available. These are also defined as <color> elements - just with fewer colors mapped.
- The other button LEDs are shown outlined in blue. They have seven possible states (off, dim, dim flash slow, dim flash fast, bright, bright flash slow, bright flash fast). I've mapped these as <bar> elements where the min is 0 and the max is 6. This means that in the mapping I need to send a value from 0-1 to get the LEDs to do the right thing. For example, 0 is off and 1 means blink fast (bright). To make the mapping easier I have variables set in ONINT to represent the right values - i.e. I have $LED_OFF (0), $LED_DIM (0.1) and so on. This means in the rest of the mapping code I can just use these variables which are easier to remember. This seems to work quite well.
Cheers,
Simon
Posté Mon 13 Jul 20 @ 10:25 am
 PhantomDeejay
I don't know how you want to use it, but for all VirtualDJ supported controllers we handle the blinking of leds internally, and we don't rely to buil-in blinking states of various devices (as several of them don't offer any)
This also allows for "any" possible time blinking, without worrying if the controller supports it or not.
Therefore I would suggest you to just map properly the on and off states of the leds.
VirtualDJ can take care of the rest (and also provide 2 colors blinking for RGB leds, e.g. : pause ? blink 1500ms ? color 'green' : color 'orange' : off)
Posté Mon 13 Jul 20 @ 11:46 am
djdaduser22278467 wrote :
The other button LEDs are shown outlined in blue. They have seven possible states (off, dim, dim flash slow, dim flash fast, bright, bright flash slow, bright flash fast).
The other button LEDs are shown outlined in blue. They have seven possible states (off, dim, dim flash slow, dim flash fast, bright, bright flash slow, bright flash fast).
As explained by Phantom, better define them as <led>. No average user will understand that the constant value should be to turn on/off/dim. and blinks are handled by VirtualDJ.
So if a led needs x40 to turn on, x00 to turn off and 0x01 to dim, you can have...
Example:
<led note="0x12" value="0x40" zero="0x01" channel="0" name="LED_BUT_1"/>
and if you want to turn off on exit, you can add ..
<exit sendsysex="901200"/>
and/or also chain more leds like..
<exit sendsysex="901200901300901400"/>
Posté Mon 13 Jul 20 @ 12:34 pm
como conseguiu acender os led do controlador.
Posté Fri 28 Apr 23 @ 12:50 am