Denon DJ - PRIME GO - Disposition
Écran
Prime GO has a fully functional and customize-able 7" touch-screen offering all the information needed for your mix. The default GUI for the screen will be automatically downloaded the first time you connect the Prime GO to a computer running VirtualDJ (Internet connection is required at least for the 1st time)
The default GUI of Prime GO offers a Decks view with the ability to hide the Pads section, and a Browser view with Large Browser and Mini Decks, along with a view for Settings.
Hold
SHIFT down and then press the
[VIEW] button on the Prime GO to show/hide the Pads section.
Use the
VIEW button to toggle between the Decks view and the Browser view (with Mini Decks)
 Denon Prime GO Screen - Decks view
 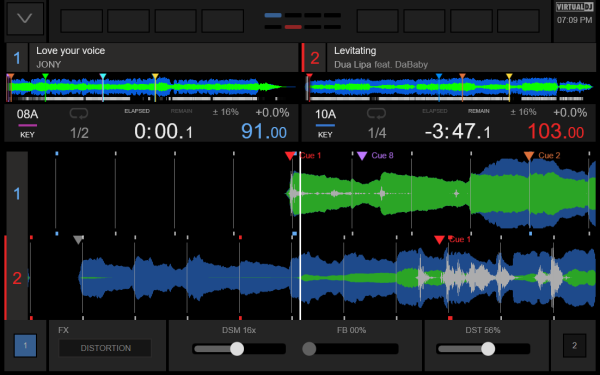 Denon Prime GO Screen - Decks (no Pads) view
 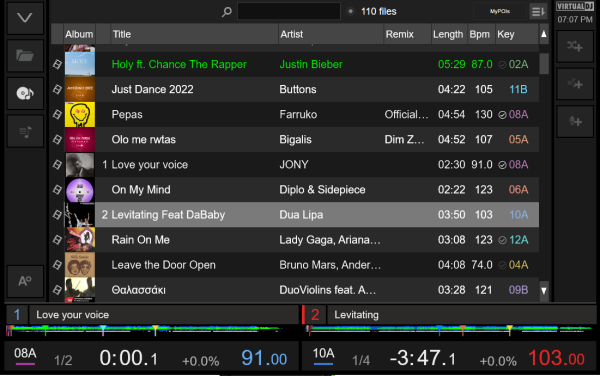 Denon Prime GO Screen - Browser view
 DECKS
Denon Prime GO Screen - Deck view
Denon Prime GO Screen - Mini Deck view  Denon Prime GO Screen - Effects view
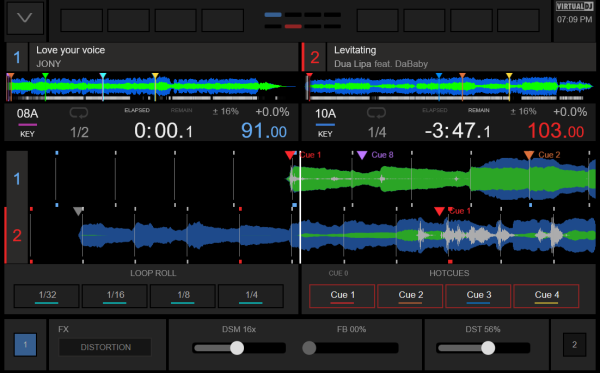
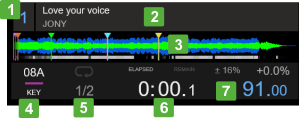
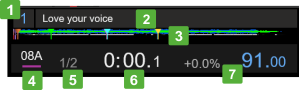
  Denon Prime GO Screen - Pads view 1Deck number. 2Track's Title, Remix and Artist. 3Track's progress wave with Hotcues markers. Can be locked from Settings to prevent accidental taps4Track's musical key information. Key value can be displayed in Harmonic or Camelot view. Line is colored based on the key value. The MATCH text will be highlighted when Track's key matches the key of the other Deck.
Tap this area to get more key controls at the Deck info area.5Current Loop size in beats. Quantize indicator/button 6Track's Times (Total, Elapsed/Remain). Tap the Elapsed/Remain Time area to toggle between the 2 views.7Track's Tempo information : Current BPM, Pitch, Pitch range%, Master Deck indicator.8Indicates the Decks that the selected Effect is assigned to9Displays the name of the selected Effect.10Displays the Parameter 2 value of the selected Effect.11Displays the Parameter 3 value of the selected Effect.12Displays the Parameter 1 value of the selected Effect.13Performance Pads. Displays the name of the currently selected Pads page, the values of its Parameters (if available) and information about the Pads functionality of the selected page.BROWSER
 Denon Prime GO Screen - Folders view
 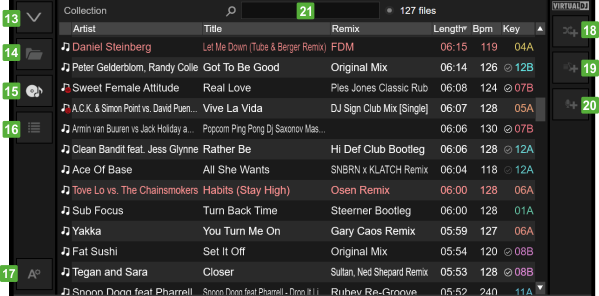 Denon Prime GO Screen - Songs List view
 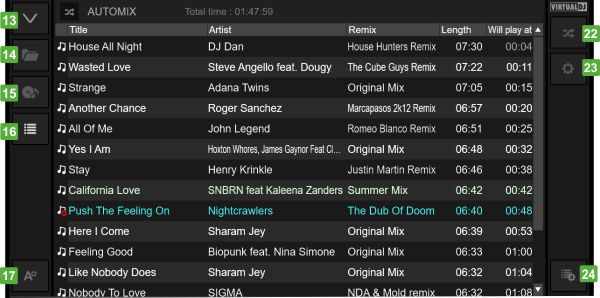 Denon Prime GO Screen - Sideview (Automix) view 13Expand Browser (Large Browser with Mini Decks view) or go back to Normal Decks view.14Select to view the Folders List.15Select to view the Songs List.16Select to view the Sideview. Tap again to cycle through the available lists of Sideview (Automix, Sidelist, Karaoke, Sampler and Shortcuts.17Text Options. Tap to show/hide buttons to enlarge/reduce the Font size and 3 levels of Line padding18Add the selected Folder or Track(s) to Automix list.19Add the selected Folder or Track(s) to Sidelist list.20Add the selected Folder or Track(s) to Karaoke list.21Tap to get the On-Screen Keyboard and search for tracks in your Library22Tap to start/stop the Automix or Karaoke mode , depending on the Sideview list.23Tap to get a menu with Options for Automix, Karaoke or other Sideview list.24Tap for Sideview Options (show/hide tabs, add shortcuts)
SETTINGS
Hold down the
[VIEW] button for more than 2 seconds to get the SETTINGS view. Press the VIEW button again to go back to the Decks view.
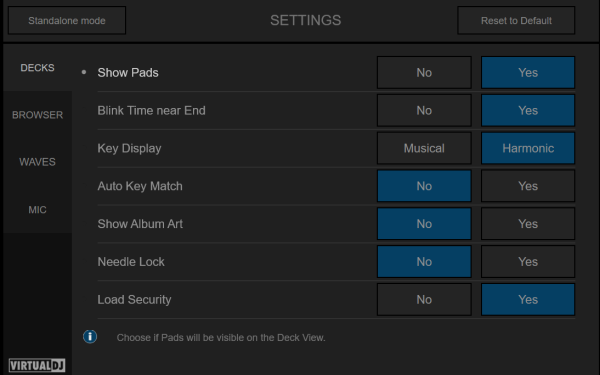
Various settings are offered to adjust views, Waves, Browser behavior etc. and their values will be kept across sessions. A description of each setting is displayed at the bottom of the view, each time you tap, select or change a setting.
The Settings view will also offer a button to
revert to Standalone mode, without exiting VirtualDJ.