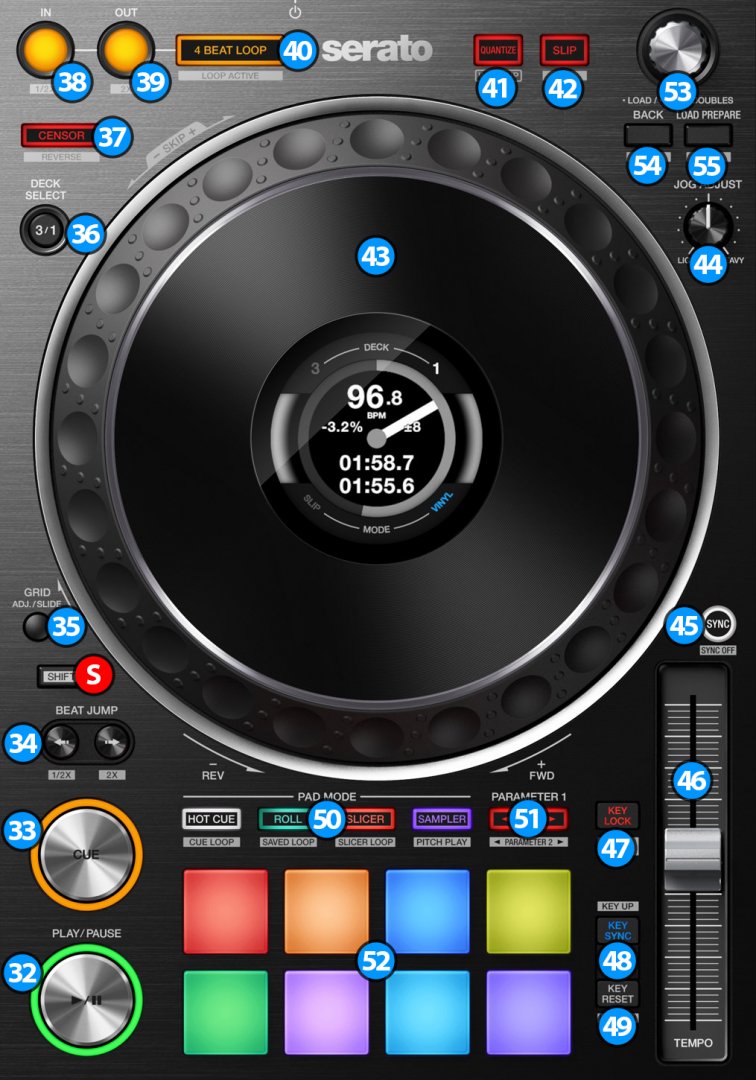
PLAY/PAUSE. Plays / Pauses the track. Press and hold SHIFT and then press this button to "stutter-play" the track from the last set Cue Point.
CUE. When the Deck is paused, you can set a temporary Cue Point by moving the Platter to place the Audio Pointer at the desired location and then pressing the Cue Button. During playback, you can press the Cue Button to return the track to this Cue Point. (If you did not set a Cue Point, then it will return to the beginning of the track.). If the Deck is paused, you can press and hold the Cue Button to play the track from the Temporary Cue Point. Releasing the Cue Button will return the track to the temporary Cue Point and pause it. To continue playback without returning to the Temporary Cue Point, press and hold the Cue Button, then press and hold the Play Button, and then release both buttons. Hold down SHIFT and then press this button to return to the beginning of the track.
BEAT JUMP: Use these buttons to move track backwards/forward by 4 beats*. Keep the buttons pushed for continuous seeking. *-> The amount of beats to jump is adjustable. Hold down SHIFT and press Jump back button to halve the amount of beats. Hold down SHIFT and press the Jump forward button to double the size of beats. Each time the unit gets connected to VirtualDJ the amount of beats will reset back to default 4 beats value.
SSHIFT. Press and hold this button to access secondary functions (black lettering in gray box) of other controls on the DDJ-1000SRT
GRID ADJUST: Hold this button pressed and move the outer surface of the jog (43) to shift the grid of beats (CBG) of the current track. Hold this button pressed and move the top / touch sensitive surface of the jog (43) to adjust the BPM of the current track.
DECK SELECT. Switch Left decks (1 and 3) and Right Decks (2 and 4).
CENSOR. Press and hold this button to play the track backwards. On release the track will continue from the position it would have been if the button was never pressed. Hold down SHIFT and press this button (momentarily) to play the track backwards. Press again to return to forward direction.
LOOP IN. Use this button to set a Loop In point (for manual looping). Hold down SHIFT and press this button while a loop is active in order to halve the length of the current loop
LOOP OUT. Use this button to set a Loop Out point (for manual looping). Hold down SHIFT and press this button while a loop is active in order to double the length of the current loop.
4 BEAT LOOP. Use this button to activate an automatic 4 beat loop. If a loop is active use this button to exit the loop Hold down SHIFT and press this button to activate a Saved Loop.
QUANTIZE. Press this button to toggle Quantize on/off. When Quantize is enabled, setting loops, jumping between hot cue points and starting playback of the deck will snap to the grid (CBG) of the track.
SLIP. Enables Slip Mode. Several software functions (such as Jogwheel movements, HotCues and Loops) will apply temporary on the track, and the track will return to the position it would have been if those functions were not triggered. Hold down SHIFT and press this button to toggle between the Scratch and Bend Jogwheel modes.
JOGWHEEL. Pressure sensitive platter for scratching (Vinyl Mode) or bending (CD Mode).
JOG FEELING ADJUST. Adjust the tension of the jogwheel (hardware operation)
SYNC. Press this button to automatically match the corresponding Deck's tempo with the opposite Deck's (or the Master Deck’s if using a 4 decks Skin) tempo and phase. Hold down SHIFT and press this button to reset the tempo of the track back to it's original value.
TEMPO. Controls the track's playback tempo.
KEY LOCK. Press this button to "lock" the track's pitch to its original key. The track's tempo will remain at the speed designated by the Pitch Fader. Hold down SHIFT and press this button to cycle through the available pitch ranges (8%, 16%, and 50%)
KEY SYNC. Press this button to match the musical Key of the track with the Key of the Master deck (or the other deck if using a 2 decks skin). The change of the Key will be the smallest required to make it compatible with the other Key. Hold down SHIFT and press this button to increase the key of the track by one semitone.
KEY RESET. Press this button to reset the musical Key of the track to it's original value. Hold down SHIFT and press this button to decrease the key of the track by one semitone.
PAD MODE. Switch the pads of the unit to various modes (see PADS)
PAGE/PARAMETERS. Offer various operations, depending on the PADs Mode (see PADS)
PADS. Offer various operations, depending on the PADs Mode (see PADS)
BROWSE. Turn: Scrolls through files or folders. Push: If focus is on the Folders list press the knob to set focus on the Songs list. If focus is on the Songs list, press once to load the selected track on the deck, or press twice (double-click) to clone the track from the other deck to this deck. Hold down SHIFT and press the knob down to display the VirtualDJ Browser in zoom state.
BACK. Press this button to set focus to the Folders list. If focus is on Folders list, use this button to expand/collapse sub-folders. Hold down SHIFT and press this button to add the selected track on the current playlist.
LOAD PREPARE.. Press this button to set focus to the Sideview list. If focus is on Sideview list, press this button to set focus back to Songs list. Hold down this button for one second to show/hide the track info panel. Hold down SHIFT and press this button to cycle though the available Sideview lists (Automix, Sidelist, Karaoke, Sampler and Clone).