


DDJ-SR
Platines
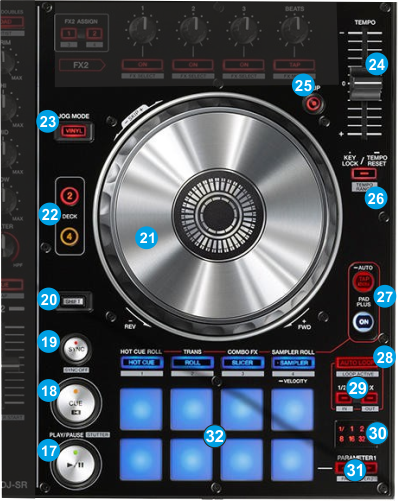
- PLAY: Play/Pauses the track. Hold SHIFT and then press this button to play the track in Stutter mode (while pressed)
- CUE: When the Deck is paused, you can set a temporary Cue Point by moving the Platter to place the Audio Pointer at the desired location and then pressing the Cue Button. During playback, you can press the Cue Button to return the track to this Cue Point. (If you did not set a Cue Point, then it will return to the beginning of the track.). If the Deck is paused, you can press and hold the Cue Button to play the track from the Temporary Cue Point. Releasing the Cue Button will return the track to the temporary Cue Point and pause it. To continue playback without returning to the Temporary Cue Point, press and hold the Cue Button, then press and hold the Play Button, and then release both buttons.
Hold SHIFT and then press this button to return to the beginning of the track - SYNC: Syncs the deck with the opposite one. Hold SHIFT and then press this button to set the deck as Master Deck. Using 4 decks skins, all other decks will sync to the Master Deck.
- SHIFT: The SHIFT button if held offers additional functionality to several buttons/knobs.
- JOG: Touch sensitive platter for scratching (vinyl mode) or bending (CD Mode). Hold SHIFT and use the JOG in Seek (Search) mode.
- DECK SELECTORS: Select the deck you wish to control with both Deck and Mixer buttons/knobs/faders (1/3 for the left side and 2/4 for the right side).
- VINYL: Sets the Jog of the deck to Bend (CD) or Scratch (Vinyl) Mode.
- PITCH FADER : Adjusts the Tempo of the track
- SLIP: Enables Slip Mode on each deck. Several software functions (such as Jogwheel movements, HotCues and Loops) will apply temporary on the track, and the track will return to the position it would have been when those functions are not triggered.
- KEYLOCK: Press this button to enable/disable the Master Tempo (Key Lock) of the deck. Press and hold the same button to reset the Tempo (PITCH) to zero position. Hold SHIFT and press this button to select one of the available Pitch ranges for the PITCH/Tempo Slider.
- PAD PLUS MODE: The PAD MODE is fully supported in VirtualDJ 8, if the unit is set to the appropriate mode. In this mode, several functions follow the BPM of the loaded track. See PAD PLUS mode
- AUTOLOOP: Sets an Auto Loop.
- 1/2X-2X: Halves/Doubles the size of the Loop. Hold SHIFT and press the 1/2X or 2X buttons to set a Loop In or Loop Out point (for manual looping)
- LOOP LEDs: The Leds indicate the selected size of the Loop. The 1/ is combined with other leds to offer sizes less than 1 beat. The + indicates that a loop larger than 32 beats is selected.
- PARAMETER-/+: These buttons offer different functions depending on the Mode of the PADs. See PADS.
- PADS: The 8 PADs offer different functions depending on the Mode of the PADs. See PADS..