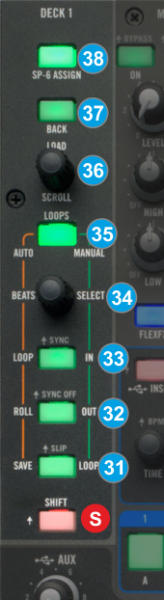
LOOP/SAVE/SLIP In Auto Loop mode, use this button to save the last triggered loop to the 1st slot. If a loop is already saved (led will be bright orange), use the same button to enable the saved loop. Hold the same button down for more than 1sec to delete the saved loop.
In Manual Loop mode, use this button to trigger a loop of a pre-selected size in beats or exit a manual loop.
In All modes, hold SHIFT down and then use this button to enable/disable Slip mode on the left or right deck. When Slip mode is enabled, several functions such as scratching, HotCues, loops etc. will act temporary and the track will return to the position it would have been if the action was never triggered.
OUT/ROLL./SYNC OFF In Auto Loop mode, use this button to enable/disable the Loop Roll mode. If enabled (led bright orange) the applied loops will act temporary and the track will resume to the position it would have been if the loop was never triggered.
In Manual Loop mode, use this button to set a Loop Exit point. If a loop is enabled, use the same button to enable/disable the Loop Out Wheel mode and then use the jogwheel on the VirtualDJ GUI or a MIDI controller to fine adjust the Loop Exit point (led will flash green). Press again to turn off this mode or the Loop button to exit.
In All modes, hold SHIFT down and then use this button to set the left or right deck as Master Deck (all other decks will sync to the Master Deck). Hold SHIFT down and then hold this button for more than 1 second to set the Master Deck selection back to the auto mode.
IN/LOOP/SYNC In Auto Loop mode, use this button to trigger a loop of a pre-selected size in beats (led will flash orange when enabled).
In Manual Loop mode, use this button to set a Loop Entry (In) point. If a loop is enabled, use the same button to enable/disable the Loop In Wheel mode and then use the jogwheel on the VirtualDJ GUI or a MIDI controller to fine adjust the Loop Entry point (led will flash green). Press again to turn off this mode or the Loop button to exit.
In All modes, hold SHIFT down and then use this button to synchronize the tempo and phase of this deck with the opposite (or the Master Deck if more than 2)
SELECT/BEATS ENC. Use this encoder to select the length of the applied loop in beats. Turn clockwise to double the size and anti-clockwise to half the size. Push the encoder to trigger the selected loop. When a Loop is triggered, hold SHIFT down and then use the encoder to move the loop forward or backwards by half the size of the applied loop in beats.
MANUAL/AUTO. Use this button to toggle between the Manual and Auto Loop mode.
SCROLL. Use this encoder to scroll through files or folders in the selected Browser Window. Hold SHIFT down and then use the encoder to cycle through the available views of the Sideview (Automix, Sidelist, Karaoke, Sampler and Shortcuts)
Push the encoder to enter the Songs list (if the focus is on the Folders list) or load the selected track to the left or right deck (if focus is on any other Browser window) Hold SHIFT down and then push the encoder to add the selected track to the Automix list.
BACK. Use this encoder to scroll through files or folders in the selected Browser Window.
SP-ASSIGN. When 2 computers are sharing the same mixer, define which of them will control/use the Sampler buttons.