ALLEN & HEATH - XONE 96
SETUP
STEP 1 : CONNECTIONS
- Connect amplifier or amplified speakers to the rear-panel Master Outputs of the device.
- Connect your Headphones to the top panel socket using a 1/4" or 1/8" plug.
- Connect USB 1 or USB 2 ports of the device to a USB port of your computer via the
, using a standard USB cable. - Optionally connect your DVS devices (Timecode Vinyl or CD) to the rear panel Inputs PHONO or LINE. See Advanced Setup - DVS
- When the above connections are done, connect the Allen & Heath Xone:96 to AC and power on.
Additionally , you can connect a Xone K2 to the Xone:96 via the XLINK socket using the provided cable. See Advanced Setup.
STEP 2 : DRIVERS
Mac OS : No Driver is required to install for Mac OS computers. The Operating system will auto-install the necessary driver for this device when connected to a USB port.
Windows : Download and install the Xone 96 Windows driver from https://www.allen-heath.com/hardware/xone-series/xone96/resources/
STEP 3 : VirtualDJ Setup
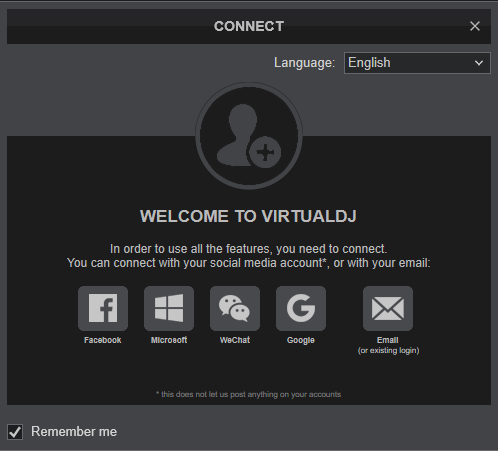
Once VirtualDJ is launched, a Connect window will appear to enter your virtualdj.com account credentials.
A Pro Infinity or a Pro Subscription License is required to fully use the Xone 96. Without any of the above Licenses, the device will operate for 10 minutes each time you restart VirtualDJ.
https://www.virtualdj.com/buy/index.html
Click on the "XONE 96" if your speakers are connected to the Main Output at the rear panel of the device.
You can still make changes in the Audio setup from VirtualDJ Settings->AUDIO tab.
Press OK.
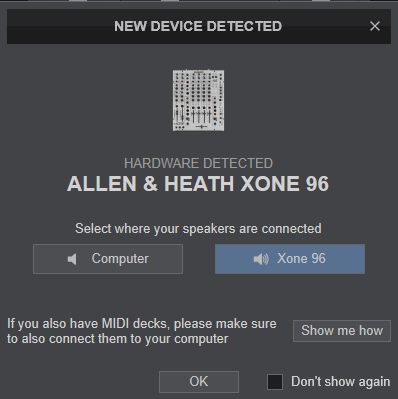
The device is now ready to operate.
MIDI Operation
The device should be visible in the MAPPING tab of Config and the “factory default” available/selected from the Mappings drop-down list.
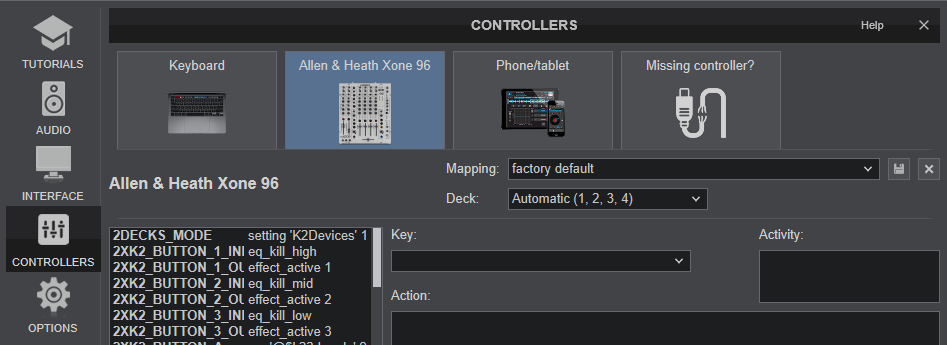
Some of the device's Faders and buttons send Midi messages, but only the Volume Faders and the Crossfader are assigned to VirtualDJ actions. The rest of the assigned Keys offered by the default Mapping, are for the Xone K2 support through the X-LINK socket.
AUDIO Setup
The device has a pre-defined Audio setup and a special button in the AUDIO tab of Config to provide that.
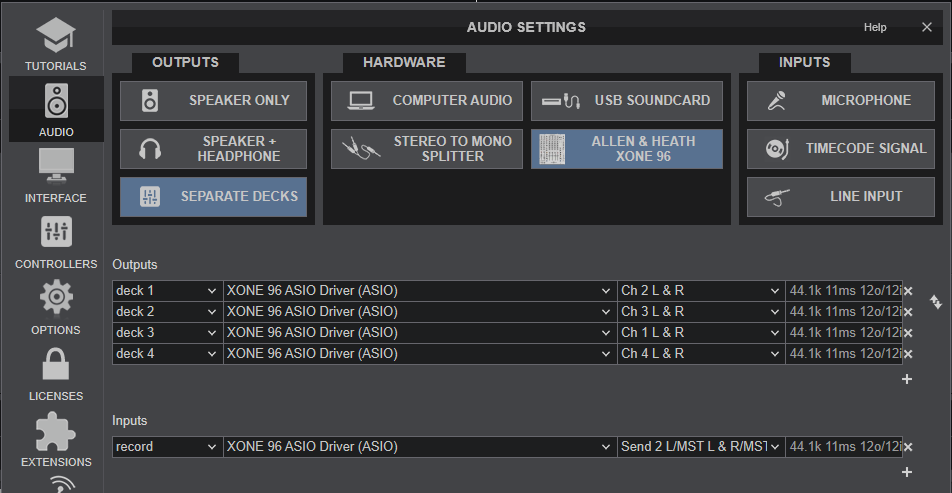
Please read the manual of Xone 96 for further functionality (available at https://www.allen-heath.com/hardware/xone-series/xone96/resources/ )
For further software settings please refer to the User Guides of VirtualDJ. https://www.virtualdj.com/manuals/virtualdj/index.html
MIXER CHANNELS 1 to 4 CONTROLS
The Allen & Heath XONE 96 offers mostly hardware/internal functionality for which you will need to read the device manual from https://www.allen-heath.com/hardware/xone-series/xone96/resources/
In this manual we will describe only the additional software functionality and options when using VirtualDJ
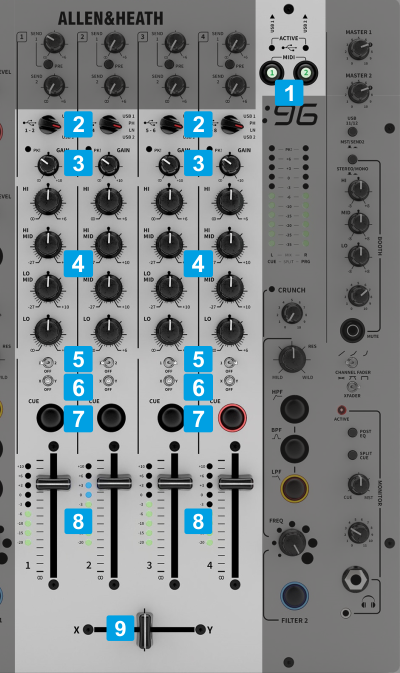
MIDI ACTIVE & SOURCE SELECT
- MIDI / ACTIVE. Depending on the USB 1/2 connection at the rear panel use the MIDI buttons 1 and 2 to enable the MIDI functionality. The device will still be working even if the MIDI is not active, but it is strongly advised to have it enabled so that VirtualDJ to be aware of the Volume and Crossfader positions to assist with Video mixing, automatic Master Deck assignment etc.
The ACTIVE leds will be lit if the device is connected to a USB port of a computer. - SOURCE. Make sure all the Mixer Channels are set to USB1 or USB2 source (depending on the USB port of the Xone 96 you used to connect with your computer) in order VirtualDJ to receive and send Audio.
If any of the Mixer Channels are not set to USB 1/2 source, then VirtualDJ will not be able to send or receive Audio and MIDI from those Channels.
CHANNELS LAYOUT
By default VirtualDJ is using a 3-1-2-4 Channel order.
This means that from left to right the channels are Deck 3, Deck 1, Deck 2 and Deck 4
A different Mixer Channel Order can be set via VirtualDJ Settings->OPTIONS tab with the MixerOrder setting.
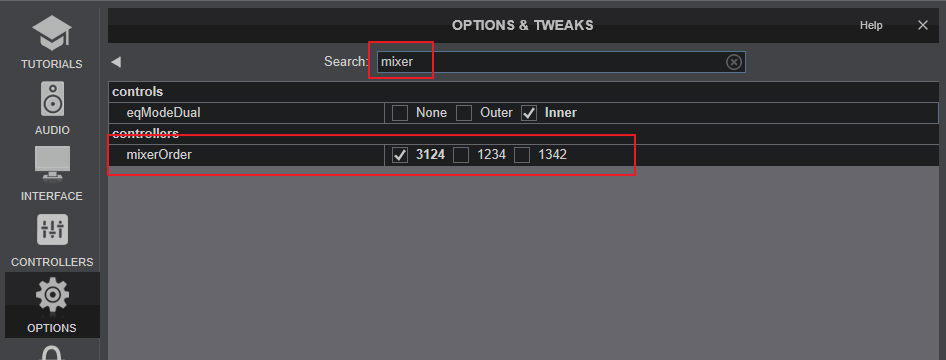
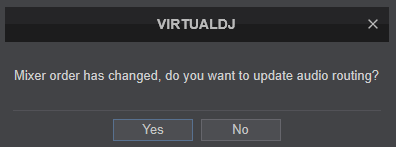
With the default Audio configuration applied, VirtualDJ will then ask if you wish to apply the different Mixer Order to the Audio Setup. To avoid miss-functionality it is strongly advised to reply with Yes.
OTHER MIXER CONTROLS
- GAIN. Adjust the Gain of each mixer channel. The output level of each Channel will be shown as indication on the VU meters.
These knobs do not send MIDI and device is applying its own Gain (after the VDJ internal Gain) - 4-BAND EQ. Adjust the Low/Lo-Mid/Hi-Mid/High frequencies for each mixer channel.
These knobs do not send MIDI, the device applies its own hardware equalizer, therefore you will not be able to control VirtualDJ EQ. - FILTER ASSIGN. Use these switches to assign each Mixer Channel to one of the 2 available Filter sections (1),(2) or (Off).
These switches do not send MIDI. - CF ASSIGN. Use these switches to assign each Mixer Channel to a side of the Crossfader (Left (X) / Thru (Off) / Right (Y)
These switches do not send MIDI, the device applies its CF Assignment. - CUE (PFL) (per channel) Press these buttons to send each channel to the Headphones Output channel. These buttons perform internal/hardware functionality. Even though these buttons send/receive MIDI, itis advised not to assign to a relative VDJ action, as there will be a conflict.
- VOLUME. Adjust the Volume of each channel. These faders offer hardware/internal functionality. They send MIDI messages as well and those are assigned to move the Volume Faders on VirtualDJ skin, however they will work in fake mode, so adjusting the Volumes from VDJ skin will not affect the Channel volume.
- CROSSFADER. Blends audio between the channels assigned to the left and right side of the crossfader.
The CF sends MIDI messages as well and it is assigned to move the Crossfader on VirtualDJ skin, however it will work in fake mode, so adjusting the Crossfader from VDJ skin will not affect the audio blending.
OTHER OUTPUTS
The Allen & Heath Xone 96 offers 12 USB outputs. Outputs 1 to 8 are used for Mixer Channels 1 to 4.
The additional 2 stereo outputs can be used with VirtualDJ by setting the Mixer Channels A and B to USB 1 or USB 2 (depending on the connected USB port at the rear panel)
Below is an example of using Channels A and B for VirtualDJ Sampler and Prelisten player
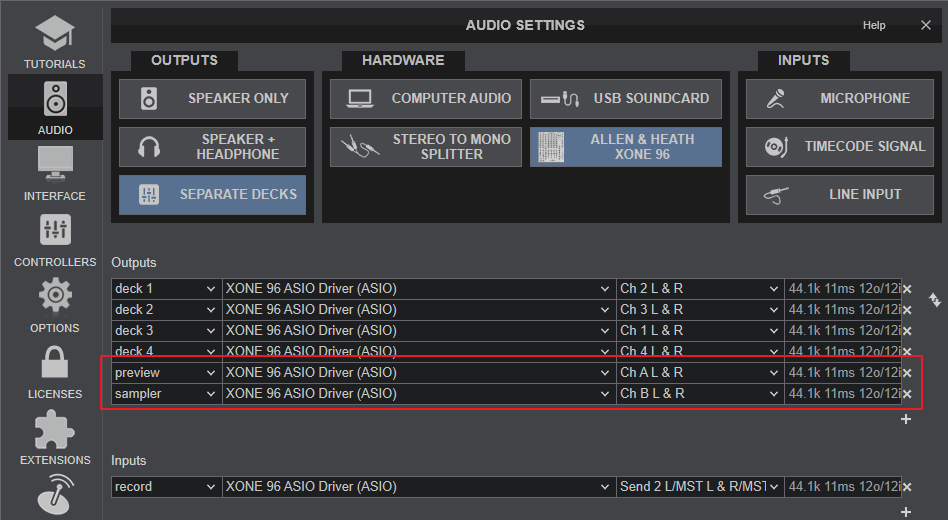
Click again on the [+] under the last line of the Outputs to create an additional line.
Select "preview" , the Xone 96 sound card and Channels CH A L&R from the drop-down lists.
Click on the [+] under the last line of the Outputs to create an additional line
Select "sampler" , the Xone 96 sound card and Channels CH B L&R from the drop-down lists.
Click to APPLY.
The above Audio setup and Settings, will now route the audio from the Sampler to CH B and the output from the Prelisten player of VirtualDJ to Mixer CH A
Of course the Order can be different.

- SOURCE. Set the SOURCE rotaries of CH A and CH B to USB 1 or USB 2 depending on the USB Port you used to connect the Xone 96 to your computer.
- GAIN. Adjust the Gain of each mixer channel. The output level of each Channel will be shown as indication on the VU meters.
These knobs do not send MIDI and device is applying its own Gain - 4-BAND EQ. Adjust the Low/Lo-Mid/Hi-Mid/High frequencies for each mixer channel.
These knobs do not send MIDI, the device applies its own hardware equalizer. - FILTER ASSIGN. Use these switches to assign the Mixer Channel to one of the 2 available Filter sections (1),(2) or (Off).
These switches do not send MIDI.
- CUE (PFL) (per channel) Press these buttons to send each channel to the Headphones Output channel. These buttons perform internal/hardware functionality. Even though these buttons send/receive MIDI, itis advised not to assign to a relative VDJ action, as there will be a conflict.
- VOLUME. Adjust the Volume of each channel. These faders offer hardware/internal functionality. They send MIDI messages as well and those are assigned to move the Volume Faders on VirtualDJ skin, however they will work in fake mode, so adjusting the Volumes from VDJ skin will not affect the Channel volume.
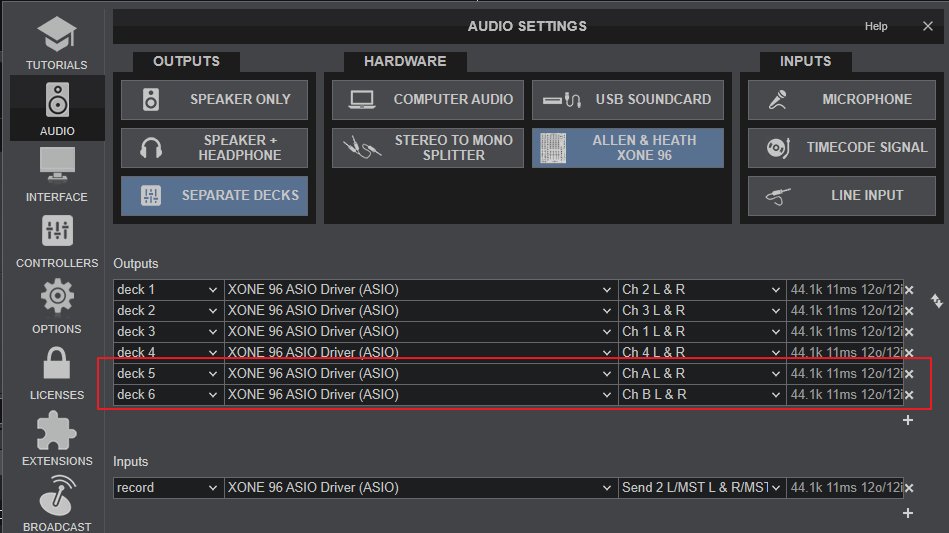
Alternatively, the extra 2 stereo USB Outputs, can be used to route 2 extra VirtualDJ Decks
Below is an example of Audio Setup sending 6 Decks to Mixer Channels 1 to 4 and A to B.
ADVANCED SETUP
The Xone 96 offers 2 built-in USB Audio interfaces (sound cards) by connecting the device with a USB port of a computer using the USB 1 or USB 2 sockets at the rear panel and each one of them offers 12 Outputs and 12 Inputs.
RECORD & BROADCAST
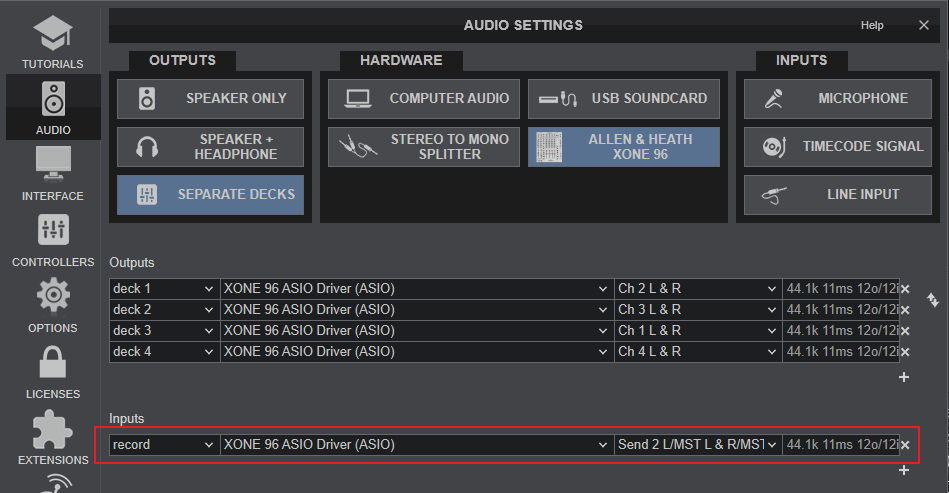
Recording your mix with a mixer applying it's own audio mixing, Equalizer, Gain, Filter etc, requires a dedicated Recording Input. By default VirtualDJ is using Inputs 11,12 (Send 2 L&R) which is included in the pre-defined Audio setup of VirtualDJ
IMPORTANT :
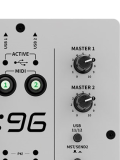
Make sure the USB 11/12 button below the MASTER volume knobs is set to MST (Off)
TIMECODE - DVS
The Xone 96 offers 4 stereo inputs suitable for Timecode (DVS) control to 4 VirtualDJ Decks, using CH Inputs 1 to 4. Read further information for Timecode Inputs at VirtualDJ Manual
- Depending on the DVS/Timecode device type (Turntable-Vinyl or CD), connect your Timecode device to the LINE or PHONO inputs at the rear panel of the Xone 96. Make sure the switchers below each Input is properly set to LN/PH depending on the connection.

Xone 96 - Rear panel - Timecode Inputs - Open VirtualDJ Settings and select the AUDIO tab.
- Click on the TIMECODE SIGNAL button at the top-right and VirtualDJ will add the necessary inputs in Audio setup. You can remove the inputs that are not connected (e.g leave only 2 of them if you are using just 2 Timecode inputs)
- Click APPLY.
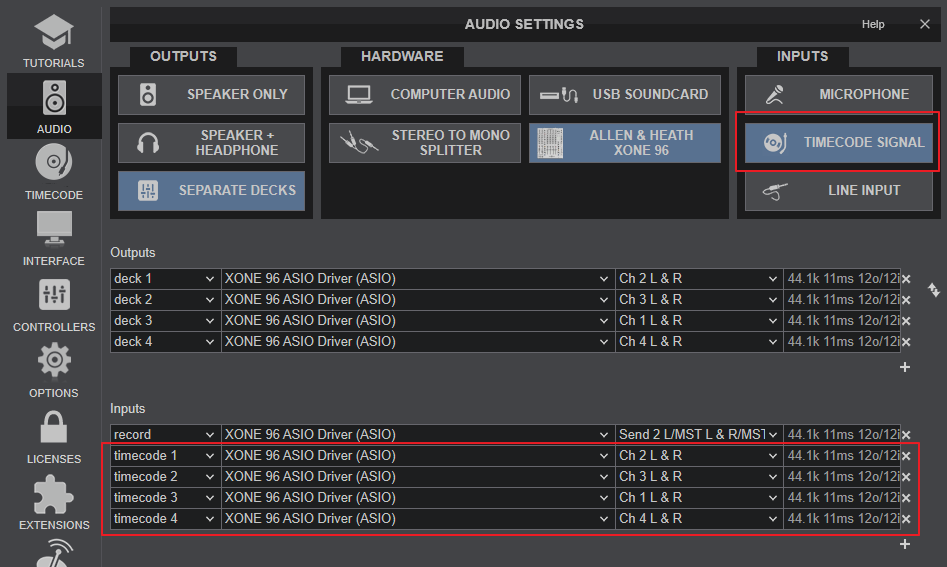
Note : For DVS control, the Ch1-Ch4 SOURCE rotaries at the top panel, need to be on USB 1 / USB 2 (not PH/LN)
X-LINK
A Allen & Heath Xone K2 device (or 2 if chained) can be connected to the XLINK port of the Xone 96 instead of USB, and allow the functionality of the Xone K2 in VirtualDJ.
The Xone K2 devices will not be visible in the CONTROLLERS tab of VirtualDJ Settings, but their MIDI functionality will occur through the Xone 96 device.
The functionality of the Xone K2 is explained in the K2 Manual
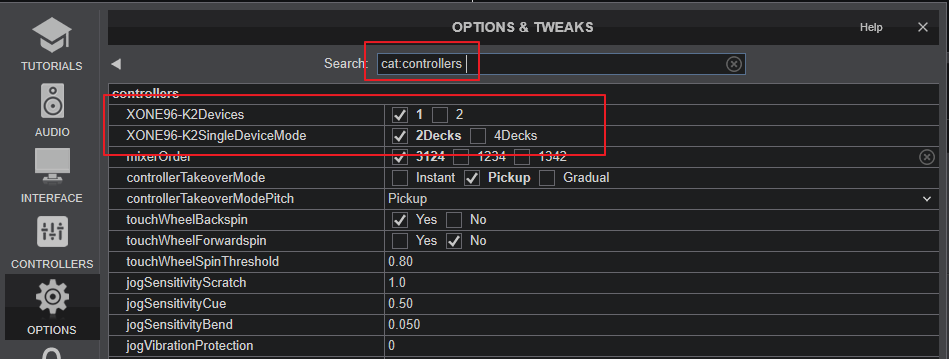
In Settings ->OPTIONS tab ->Controller category, you will find 2 K2-related settings that will auto-apply to the default Mapping of the K2 devices.
