XDJ-XZ
Configuration avancée
STANDALONE & SOFTWARE DECKS
The Pioneer XDJ-XZ is capable of controlling up to 4 Decks, combined from the 2 USB sources and VirtualDJ Decks.
Available combinations
- Both sides set to standalone (USB). When both left and right sides have tracks loaded from the USB sources, the unit offers:
[list] - Mixer Channel 3 : Audio from VirtualDJ Deck 3 when CH3 INPUT switch is set to computer position, or from external audio source connected to CH3 Inputs at the rear panel when set to LINE or PHONO.
- Mixer Channel 1 and 2 : Audio from the USB sources.
- Mixer Channel 4 : Audio from VirtualDJ Deck 3 when CH4 INPUT switch is set to computer position, or from external audio source connected to CH4 Inputs at the rear panel when set to LINE or PHONO.
The left and right Deck panels of the XDJ-XZ will control the tracks loaded from USB sources and there is no deck switch available from the SHORTCUT view. The Displays will offer waves and information only from the USB tracks[/list]
- Both sides set to LINK (VirtualDJ). When both left and right sides have tracks loaded from the LINK source (VirtualDJ), the unit offers:
[list] - Mixer Channel 3 : Audio from VirtualDJ Deck 3 when CH3 INPUT switch is set to computer position, or from external audio source connected to CH3 Inputs at the rear panel when set to LINE or PHONO.
- Mixer Channels 2 and 3 : Audio from VirtualDJ Decks 2 and 3
- Mixer Channel 4 : Audio from VirtualDJ Deck 3 when CH4 INPUT switch is set to computer position, or from external audio source connected to CH4 Inputs at the rear panel when set to LINE or PHONO.
The Deck panels of the XDJ-XZ will control the tracks loaded to Decks 1 to 4 of VirtualDJ. The deck switch is available from the SHORTCUT view. The Displays will offer waves and information from the Deck that is selected from the SHORTCUT view (left and right).[/list]
- One side set to LINK (VirtualDJ) and the other set to USB. In this case the unit offers:
[list] - Mixer Channel 3 : Audio from VirtualDJ Deck 3 when CH3 INPUT switch is set to computer position, or from external audio source connected to CH3 Inputs at the rear panel when set to LINE or PHONO.
- Mixer Channels 2 : Audio from VirtualDJ Deck 2 or USB source depending on the mode the side is set to.
- Mixer Channels 3 : Audio from VirtualDJ Deck 3 or USB source depending on the mode the side is set to.
- Mixer Channel 4 : Audio from VirtualDJ Deck 3 when CH4 INPUT switch is set to computer position, or from external audio source connected to CH4 Inputs at the rear panel when set to LINE or PHONO.
For the side set to USB 1/2, the Deck panel of the XDJ-XZ will control the track loaded from the USB 1/2 source.
For the side set to LINK (VirtualDJ), the Deck panel of the XDJ-XZ will control the track loaded to VirtualDJ Deck 1 or 2 (depending on the side).
The decks swap will not be available from the SHORTCUT view.[/list]
UTILITIES - SETTINGS
The Pioneer XDJ-XZ offers a list of settings with most of them applying when using one of the USB1/USB2 modes (playing tracks in stand-alone mode from the USB drives.)
To access the UTILITIES view...
- Hold down the MENU button for 2 seconds.
- Turn the BROWSE/ZOOM encoder at the right side of the main Display to browse through the available settings.
- Push the BROWSE/ZOOM encoder to select a setting.
- Turn the BROWSE/ZOOM encoder to adjust the value of the selected setting
- Push the BROWSE/ZOOM encoder to save the new value of the selected setting
- When done with changing the settings, press the MENU button to exit the UTILITIES view
OTHER SETTINGS
Open VirtualDJ Settings ->OPTIONS tab and select the CONTROLLER sub-category from the right side.
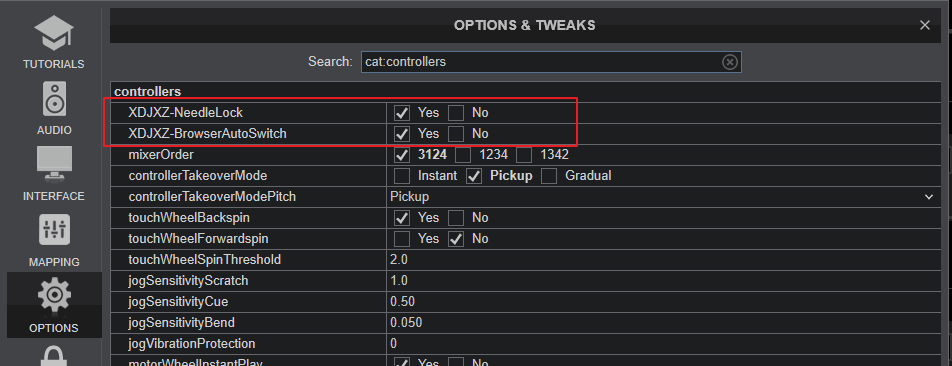
NEEDLE LOCK
When XDJXZ-NeedleLock setting is set to Yes (default selection), the Needle is unlocked and you can touch the Song Progress wave on the main LCD and jump to a position on the loaded track.
When XDJXZ-NeedleLock setting is set to No the Needle is locked and touching the Song Progress wave on the main LCD will have no effect.
This option is useful to prevent accidental track jumps when the Needle (Song Progress Wave on Display) is accidentally touched
BROWSER VIEW SWITCH
When setting BrowserAutoSwitch is set to Yes (default selection), the Browser view Switch is set to Automatic. In this mode, when a Track is selected and loaded to a Deck, the Decks/Waves view will automatically offered without pressing any other buttons.
When setting BrowserAutoSwitch is set to No, the Browser view Switch is set to Manual.and the Browser View will remain active after loading a track and the BROWSER button above the Display needs to be manually pressed to return to the Decks/Waves view.
Recording & Broadcasting
The USB Audio Interface of the Pioneer XDJ-XZ offers a dedicated Input for recording the Master Output (your mix) along with the Microphone, LINE/PHONO, and AUX Inputs directly from VirtualDJ record button (in the MASTER center panel), and is already pre-configured, so no further adjustments need to be done.

TIMECODE (DVS)
The Pioneer XDJ-XZ offers 2 stereo inputs for DVS (Timecoded CDs and Vinyls) Support.
Depending on whether you use Timecode Vinyl (Turntables) or Timecode CDs (CD Players) please perform the following steps:
- Connect your Turntables to CH 3 and/or CH 4 Inputs at the rear panel of the XDJ-XZ.
- From the UTILITIES menu (see above), set the CH3/ CH4 CONTROL TONE to either PHONO or LINE, depending on the used connections and devices type.
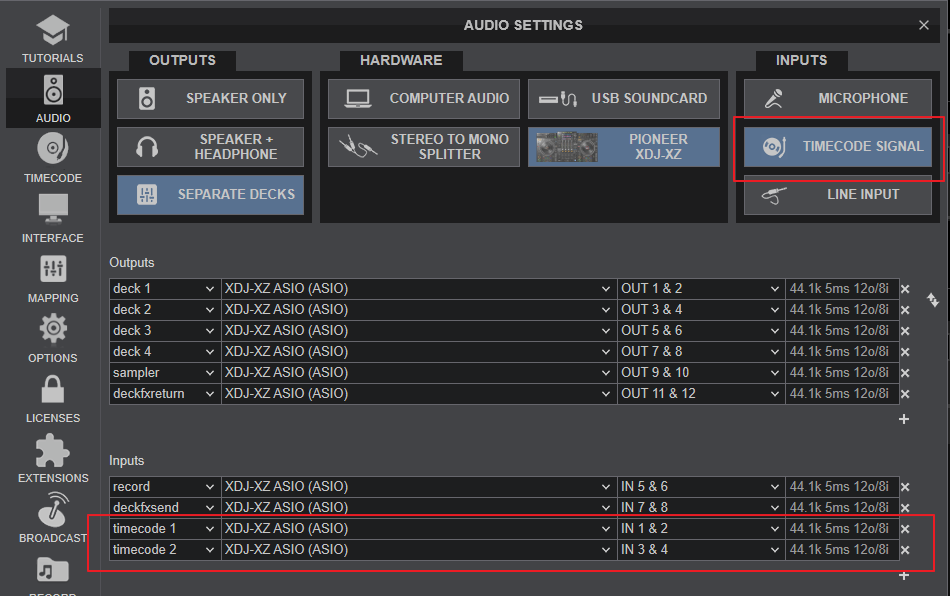
- Open VirtualDJ Settings ->AUDIO tab ans press the TIMECODE SIGNAL button from the INPUT tab, for the following Audio setup to be configured
- Click to APPLY