


TTM57 MKII
Software Controls
- JOYSTICK. Push the Joystick to select the Mute mode (TRANSFORM LED will be turned on). In this mode, use the joystick to any direction to temporary mute the corresponding channel. Push again to return to the Default mode.
In Default mode (TRANSFORM LED off):
Move the Joystick towards down to enable/disable Slip mode. When Slip mode is enabled (TRANSFORM LED will blink), several functions (such as scratching, HotCues and Loops) will act temporary and the track will resume to the position it would have been if this action was never triggered.
Move the Joystick to the DBL position (towards right for the Left deck and towards left for the Right deck), to clone the other deck to this deck. (Instant Doubles)
Move the Joystick to the INT position to enable/disable Timecode control on the corresponding deck.
Move the Joystick towards up to play the track reversed. Once the Joystick is released, the track will continue playing forward from the position it would have been as if the reverse was never triggered (Censor). - LIBRARY KNOB.
Use this encoder to scroll through files or folders in the selected Browser Window.
Push the encoder to enter the Songs list (if the focus is on the Folders list) or load the selected track to the left or right deck (if focus is on any other Browser window)
If the focus is on the Songs list, hold SHIFT down and then push the encoder to set focus to the Folders list.
If the focus is on the Folders list, hold SHIFT down and then push the encoder to expand/collapse subfolders. - LOOP ENC. Use this encoder to select the length of the applied loop in beats. Turn clockwise to double the size and anti-clockwise to half the size.
Push the encoder to trigger the selected loop. - ROLL. Press and keep this button down to apply a temporary Loop Roll. Once the button is released, the track will return to the position it would have been if the Loop has never been triggered.
While the ROLL button is pressed, use the LOOP encoder to adjust the length of the applied Loop Roll. - FX BEATS. Push the encoder to toggle between the Select (LED of the will flash) and the Parameter (LED off) control modes.
In Select mode, use this encoder to select a VirtualDJ Effect for the left and right decks.
In Parameter mode, use this encoder to adjust the 1st Parameter of the selected Effect, or have SHIFT pressed to control the 2nd Parameter of the selected effect. - FX ON. Use this button to enable/disable the selected Effect of the left and right deck.
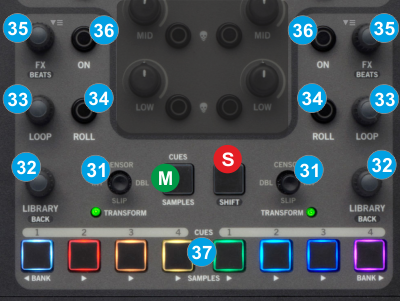
- HOTTCUES/ SAMPLES Each one of the 8 Pads offers a different functionality, depending on the selected mode (M)
HotCues 1-4 mode
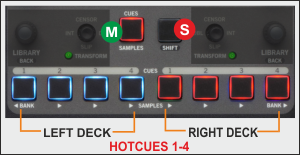 Press the CUES/SAMPLER mode button to select the HotCues mode (LED will become red)
In this mode each one of the 4 buttons per side (1-4) assigns a Hot Cue Point (1 to 4) to the left or right deck (if un-assigned) or returns the track to that Hot Cue Point if assigned.
When a Hot Cue Button is unlit, you can assign a Hot Cue Point by pressing it at the desired point in your track. Once it is assigned, the Hot Cue Button will light up blue (for Left deck) or red (for Right deck).
Hold SHIFT down and then press any of these buttons to delete its assigned Hot Cue Point.
HotCues 5-8 mode
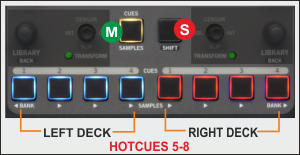 While the HotCue 1-4 mode is selected, hold SHIFT down and then press the CUES/SAMPLER mode button to select the HotCues 5-8 mode (LED will become yellow)
In this mode each one of the 4 buttons per side (1 - 4) assigns a Hot Cue Point (5 to 8) to the left or right deck (if un-assigned) or returns the track to that Hot Cue Point if assigned.
When a Hot Cue Button is unlit, you can assign a Hot Cue Point by pressing it at the desired point in your track. Once it is assigned, the Hot Cue Button will light up blue (for Left deck) or red (for Right deck).
Hold SHIFT down and then press any of these buttons to delete its assigned Hot Cue Point.
Sampler mode
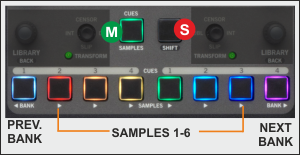 Press the CUES/SAMPLER mode button to select the Sampler mode (LED will become green)
In this mode each one of the 6 buttons (marked as >) triggers a sample (1 to 6) from the selected Sampler Bank of VirtualDJ.
The leds of those buttons will be turned off if the corresponding slot is unloaded, and will get the color of the assigned sample (if loaded)
Hold SHIFT down and then press any of these Sampler buttons to stop the playing Sample (useful if the Stutter or Unmute Trigger mode is selected)
Use the <BANK button to select and load the previous available Sampler Bank
Use the >BANK button to select and load the next available Sampler Bank
Sampler Output Channel: By default VirtualDJ will send Sampler to the USB AUX Channel. Use the AUX LEVEL knob to control the Output Volume and the AUX Filter knob to apply a Low-High Pass Filter to the playing samples.