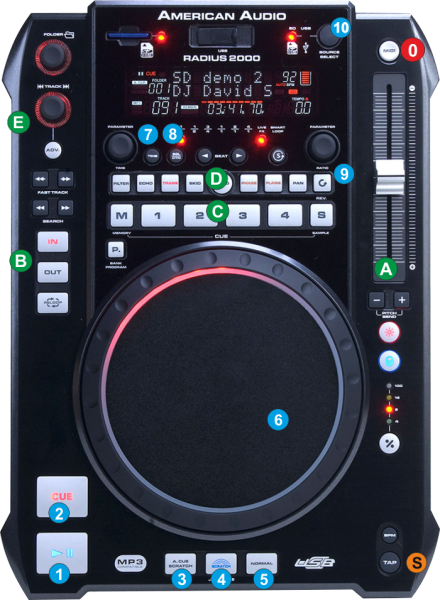
Radius 2000
Disposition
0. MIDI. Press this button to set the RADIUS 2000 to MIDI mode and allow to the unit to control a VirtualDJ deck. Notice that the unit will still be detected as a MIDI device, however it will not control any VirtualDJ operation if the unit is not on MIDI mode.
S.TAP. Press and hold this button to access secondary functions of other controls on the RADIUS 2000. While TAP is pressed, the LCD screen of the unit will display an additional “TAP” text

- PLAY. Plays / Pauses the track.
- CUE. When the Deck is paused, you can set a Cue Point by moving the Platter to place the Audio Pointer at the desired location and then pressing the Cue Button.
During playback, you can press the Cue Button to return the track to this Cue Point. (If you did not set a Cue Point, then it will return to the beginning of the track.).
If the Deck is paused, you can press and hold the Cue Button to play the track from the Temporary Cue Point. Releasing the Cue Button will return the track to the temporary Cue Point and pause it. To continue playback without returning to the Temporary Cue Point, press and hold the Cue Button, then press and hold the Play Button, and then release both buttons. - A.CUE. Press this button to enter the Jogwheel into the A.CUE mode. In this mode, each time you touch the jogwheel (the touch-sensitive part), the track will jump to the previously stored/used Cue point and will continue to scratch or bend from that position.
- SCRATCH. Press this button to set the Jogwheel to Vinyl (Scratch) mode. In this mode, use the outer part of the Jogwheel to bend (temporary speed up – slow down the tempo of the track) and the inner touch-sensitive part to scratch.
- NORMAL. Press this button to set the Jogwheel to or CD (Bend) mode. In this mode, use the Jogwheel to bend (temporary speed up – slow down the tempo of the track).
- JOG. Touch sensitive jogwheel. Use the jogwheel to scratch (in SCRATCH mode is selected), pitch bend (in NORMAL mode) or CUE jump (A.CUE mode). Hold TAP (S) down and then use the jogwheel to fast seek through the track.
The Jogwheel also offers Loop In, Loop Out and Loop Shift adjustment (see IN, Out and RELOOP buttons) - TIME. Use this button to cycle the Time Display format of the default 2 decks VirtualDJ GUI (Remain, Elapsed and Total).
Note: No time display or any other information is available for the LCD screen of the RADIUS (firmware limitation). - SGL/CONT. Use this button to enable/disable the Slip mode on the selected deck. When Slip mode is enabled several actions like HotCues, Loops and scratching with the Jogwheel will act temporary and the track will return to the position it would have been if the Slip mode was never enabled.
Note: The button is not offering any Led nor the LCD screen of the RADIUS offers any displays (firmware limitation), therefore the dedicated SLIP button on the default VirtualDJ GUI will indicate if the mode is enabled or not. - REV. Hold this button down to play the track in reverse. When released the track will continue to play from the position it would have been if the button was never pressed (censor).
While TAP(S) is held down, press this button to play the track in reverse but this time it will continue playing from the position that the reverse will be turned off. - SOURCE SELECT. Use this button to cycle through the available Center Mixer Panels of the default VirtualDJ GUI (MIXER, VIDEO, SCRATCH and MASTER)
Hold TAP (S) down and then use this button to cycle though the available software decks* and assign the RADIUS 2000 to the selected deck. Notice that while TAP is held down, the LOOP led indicators will show which deck is assigned to each unit (starting from left decks 1, 2, 3, 4, 5 and 6).
*The available decks of the software will depend on both the offered decks of the GUI and the available decks that your hardware units offer.


