


XONE 24C
Configuration avancée
XONE24C AUDIO MODE
The A&H XONE24 offers a 6out/6in USB audio interface and their channels can be used in various ways depending on the selected USB Audio mode.
For VirtualDJ it is suggested to set the device to the (default) Mode 1.
Please refer to the A&H XONE24C User guide for a detailed explanation of the other 2 modes.
https://www.allen-heath.com/hardware/xone-series/xone24c/resources/
Note that if Mode 2 or 3 is selected, the VirtualDJ Audio setup needs to be modified accordingly - mostly because of the different order of the available channels.
How to ensure the device is on the proper Mode :
- Press and hold down both Channel 1 and Channel 2 CUE buttons on the top panel.
- Power the mixer ON using the rear panel standby switch. Keeping Channel 1 and Channel 2 CUE buttons pressed down for @3 seconds after the mixer is switched on.
- Release both CUE buttons. The AUX channel CUE button blinks red rapidly to show the mixer is in its setup state.
The flashing blue FILTER button shows the current USB MODE, described above - Press the FILTER button for the required USB MODE to change between the sound card USB IN routing configurations:
AUX FILTER = MODE 1 : STREAM MODE - the default Mode for VirtualDJ
CH 1 FILTER = MODE 2 : DVS PRO MODE - alternative mode for VirtualDJ
CH 2 FILTER = MODE 3 : DAW MODE - not suggested for VirtualDJ - Press the AUX Channel CUE button to store the changes and exit the POWER-UP Setup process.
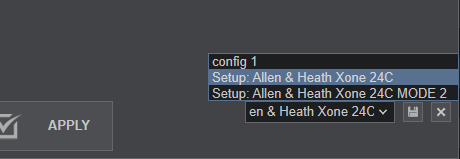
If the alternative MODE 2 is selected, due to the different Channels Order, you will need to apply the MODE 2 Audio setup from the bottom-right drop-down menu and APPLY the new setup.
DEFAULT AUDIO SETUP
The following image displays the default Audio setup for the Xone 24C, which requires speakers to be connected at the rear panel.
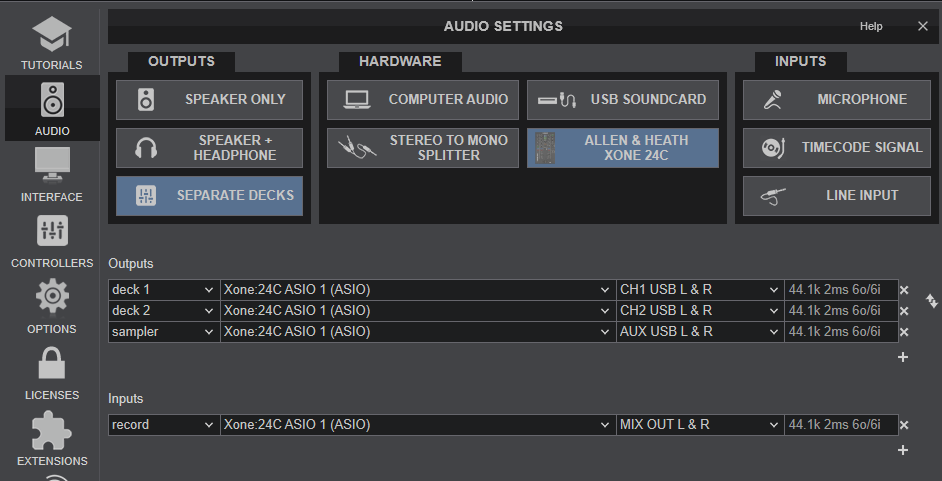
Fow Windows only : With the ASIO driver installed, open the Xone24C Control panel and make sure the ASIO 1 is selected. If the ASIO 2 is selected, make sure VirtualDJ is also using the same driver in its Audio Setup.

To open the XONE24C Control panel in Windows, you can click on the "ASIO Setup" button in VirtualDJ Audio setup, or search for the "XONE24C" Control panel app from the Search Windows in Taskbar.
SAMPLER
The default Audio setup of VirtualDJ as shown above, is using the 2 Mixer channels to route the 2 VirtualDJ decks, and the VirtualDJ Sampler to the 3rd stereo output of the device when the left-side AUX/USB/MIC switcher is set to USB. Having Sampler on its own dedicated mixer channel provides the ability to turn the output On/Off (ON button), control its volume, apply hardware EQ, preview its output ( CUE button) and apply the Xone24 HPF/LPF Filter (FILTER button).
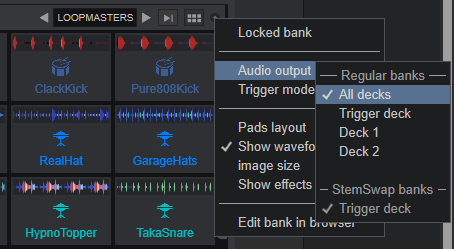
If your setup requires the use of MIC/AUX Input to your workflow, you can remove the "sampler" output from VirtualDJ Audio setup and set the switcher to either MIC or AUX. In this case, you will need to change the Sampler Output to "All Decks" (or other option) from Sampler Options and the VirtualDJ Sampler will be routed to both CH1 and CH2 of the device
TIMECODE (DVS)
The device offers built-in inputs for Timecode/DVS control in VirtualDJ.
In order for the inputs to be used for Timecode (DVS) ...
- Connect your Turntable with Timecode Vinyl to any of the 2 rear-panel Inputs and set their USB switcher to PH or your CD Player with Timecode CD and set their USB switcher to LN
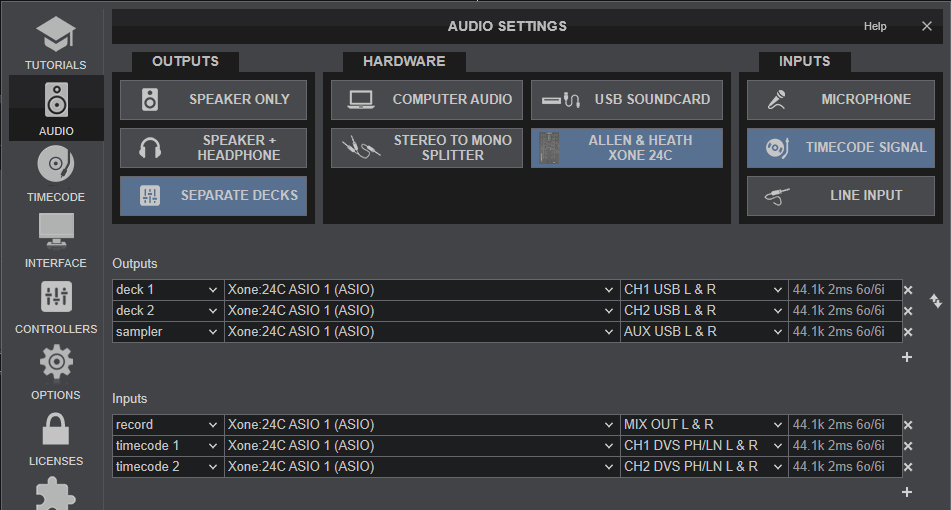
- In VirtualDJ Settings->AUDIO tab, press the TIMECODE SIGNAL button for Timecode Inputs to be added as per the following image.
For further setup information about Timecode in VirtualDJ, please refer to VirtualDJ Manual
RECORD & BROADCAST
The device is offering a dedicated Record Input, which is added to the default VirtualDJ Audio setup.
This input allows you to record your mix from VirtualDJ Decks, along with any other AUX/MIC source, as long as the "record" input is in your VirtualDJ Setup and points to the "MIX OUT" channels.
If recording is not working as expected, perhaps the Audio routing of your mixer is set to a mode other than MODE 1 and needs to be reconfigured.
