


Kontrol S8
Contrôle de la platine
S SHIFT.Hold this button down to access additional functionality for several buttons/knobs as described in this manual.
- PLAY: Play/Pauses the track.
- CUE: When the Deck is paused, you can set a temporary Cue Point by moving the Platter to place the Audio Pointer at the desired location and then pressing the Cue Button. During playback, you can press the Cue Button to return the track to this Cue Point. (If you did not set a Cue Point, then it will return to the beginning of the track.). If the Deck is paused, you can press and hold the Cue Button to play the track from the Temporary Cue Point. Releasing the Cue Button will return the track to the temporary Cue Point and pause it. To continue playback without returning to the Temporary Cue Point, press and hold the Cue Button, then press and hold the Play Button, and then release both buttons.
- SYNC: Use this button to match Tempo and Beat-Phase of the deck with the values of the opposite deck (or Master Deck if more than 2 decks are used). The Master Deck selection is made automatically by VirtualDJ, mostly depending on the Deck that is playing out in Master.
Hold SHIFT and then use this button to reset Deck's Tempo to its original value - NEEDLE SEARCH: When Track is paused, touch and slide to left/right to fine-position Track. When Track is playing, touch and slide to left/right to bend (temporary increase/decrease Tempo).
Hold SHIFT and then slide to left/right to Seek (Search) through the Track
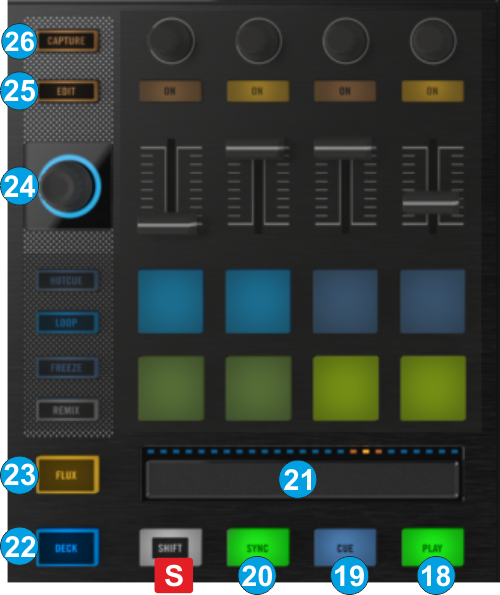
- DECK: Swap Left/Right Decks. Use the Left DECK button to toggle between Decks 1 (blue led) and 3 (white led). Use the right DECK button to toggle between Decks 2 (blue led) and 4 (white led)
- FLUX: Use this button to enable/disable Slip mode. When Slip mode is enabled, several functions such as Hotcues, Loops, Scratching etc, will act temporary (track will resume playback from the position it would have been if this function was never executed)
- LOOP: Turn left/right to half/double the size of the Loop. Push the encoder to turn on/off a Loop. Hold SHIFT down to move the loop backward/forward by 1 beat.
- EDIT: Not pre-defined to any operation
- CAPTURE: Use this button to save the current loop. when saved, use this button to enable/prepare the saved loop. Hold SHIFT down and use this button to delete the saved loop.