OPUS-QUAD
MIXER & EFFECTS
MIXER

All mixer and effects operations described in this chapter are performed via the device hardware.
However, the movement of all basic mixer elements is still visible in the VirtualDJ GUI.
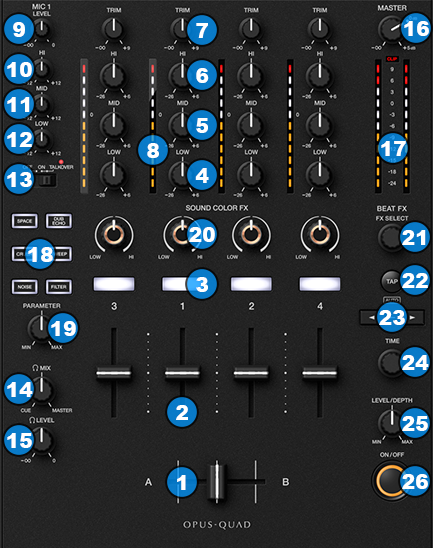
- CROSSFADER. Blends audio between the channels assigned to the left and right side of the crossfader.
- VOLUME. Adjust the Volume of each channel.
- CUE (PFL).Press these buttons to send each channel to the Headphones Output channel.
- LOW EQ. Adjust the Low frequencies for each mixer channel.
- MID EQ. Adjust the Mid frequencies for each mixer channel.
- HI EQ. Adjust the High frequencies for each mixer channel.
- TRIM. Adjust the Gain of each mixer channel.
- CH INPUT VUMETER. Shows each channels input (pre fader) volume.
- MIC 1 VOLUME. Adjust the Volume Level of MIC1 Input of the OPUS-QUAD.
- MIC 1 HI EQ. Adjust the High frequencies of MIC1 Input of the OPUS-QUAD.
- MIC 1 MID EQ. Adjust the Middle frequencies of MIC1 Input of the OPUS-QUAD.
- MIC 1 LOW EQ. Adjust the Low frequencies of MIC1 Input of the OPUS-QUAD.
- MIC 1 CONTROL. Turn ON and OFF the MIC1 Input of the OPUS-QUAD or enable the auto Talk Over.
- HEADPHONES MIXING. Adjust how the Channels and the Master Output blend at the Headphones Channel.
- HEADPHONES VOLUME. Adjust the volume of the Headphones Channel.
- MASTER VOLUME. Adjust the level of the Master Output.
- MASTER OUTPUT VUMETER. Shows the master output volume of the unit.
EFFECTS
- COLOR FX SELECT. Select one of the predefined Color Effects (Space, Dub Echo, Crush, Sweep, Noise and Filter).
- COLOR FX PARAMETER. Adjust the parameter of the selected Color Effect.
- COLOR FX AMOUNT. Adjust the amount of the selected COLOR FX for each channel. When in middle position, the COLOR FX has no effect on the sound.
- BEAT FX SELECT. Use this encoder to select one of the available Beat FX. The name of the selected Effect is displayed on the Main Display.
- TAP. Tap this button to set a new BPM value for the currently selected Beat FX (for the Effects that are beat-aware). The beats value is displayed on the Main Display.
Hold Shift down and press this button to return to automatic BPM detection. - BEAT. Use these buttons to half/double the Beats Parameter of the selected Effect (for the Effects that are beat-aware). The beats value is displayed on the Main Display.
- TIME. Use this encoder to alter the timing of the selected Effect (for the Effects that are beat-aware). The time value is displayed on the Main Display.
- FX LEVEL/DEPTH. Use this knob to adjust the Dry/Wet Parameter of the selected Effect.
- BEAT FX ON. Use button to enable/disable the selected Beat FX. Its led will flash when enabled.


