XONE 96
MIXER CHANNELS 1 to 4 CONTROLS
The Allen & Heath XONE 96 offers mostly hardware/internal functionality for which you will need to read the device manual from https://www.allen-heath.com/hardware/xone-series/xone96/resources/
In this manual we will describe only the additional software functionality and options when using VirtualDJ

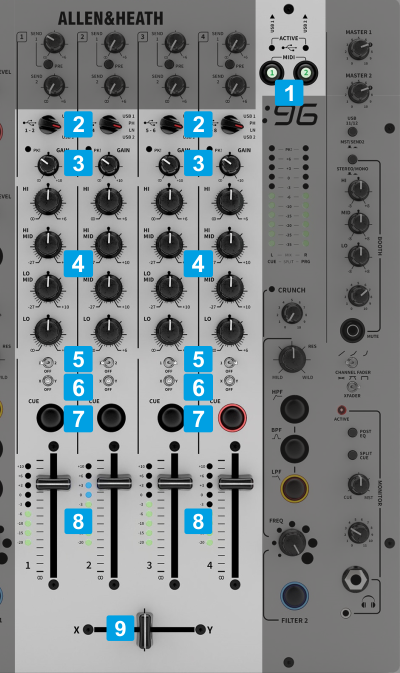
MIDI ACTIVE & SOURCE SELECT
- MIDI / ACTIVE. Depending on the USB 1/2 connection at the rear panel use the MIDI buttons 1 and 2 to enable the MIDI functionality. The device will still be working even if the MIDI is not active, but it is strongly advised to have it enabled so that VirtualDJ to be aware of the Volume and Crossfader positions to assist with Video mixing, automatic Master Deck assignment etc.
The ACTIVE leds will be lit if the device is connected to a USB port of a computer. - SOURCE. Make sure all the Mixer Channels are set to USB1 or USB2 source (depending on the USB port of the Xone 96 you used to connect with your computer) in order VirtualDJ to receive and send Audio.
If any of the Mixer Channels are not set to USB 1/2 source, then VirtualDJ will not be able to send or receive Audio and MIDI from those Channels.
CHANNELS LAYOUT
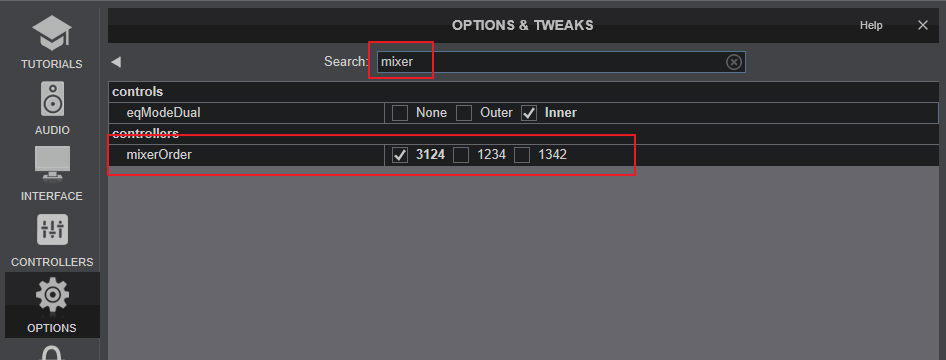
By default VirtualDJ is using a 3-1-2-4 Channel order.
This means that from left to right the channels are Deck 3, Deck 1, Deck 2 and Deck 4
A different Mixer Channel Order can be set via VirtualDJ Settings->OPTIONS tab with the MixerOrder setting.

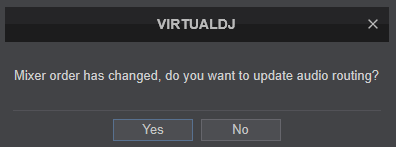
With the default Audio configuration applied, VirtualDJ will then ask if you wish to apply the different Mixer Order to the Audio Setup. To avoid miss-functionality it is strongly advised to reply with Yes.

OTHER MIXER CONTROLS
- GAIN. Adjust the Gain of each mixer channel. The output level of each Channel will be shown as indication on the VU meters.
These knobs do not send MIDI and device is applying its own Gain (after the VDJ internal Gain) - 4-BAND EQ. Adjust the Low/Lo-Mid/Hi-Mid/High frequencies for each mixer channel.
These knobs do not send MIDI, the device applies its own hardware equalizer, therefore you will not be able to control VirtualDJ EQ. - FILTER ASSIGN. Use these switches to assign each Mixer Channel to one of the 2 available Filter sections (1),(2) or (Off).
These switches do not send MIDI. - CF ASSIGN. Use these switches to assign each Mixer Channel to a side of the Crossfader (Left (X) / Thru (Off) / Right (Y)
These switches do not send MIDI, the device applies its CF Assignment. - CUE (PFL) (per channel) Press these buttons to send each channel to the Headphones Output channel. These buttons perform internal/hardware functionality. Even though these buttons send/receive MIDI, itis advised not to assign to a relative VDJ action, as there will be a conflict.
- VOLUME. Adjust the Volume of each channel. These faders offer hardware/internal functionality. They send MIDI messages as well and those are assigned to move the Volume Faders on VirtualDJ skin, however they will work in fake mode, so adjusting the Volumes from VDJ skin will not affect the Channel volume.
- CROSSFADER. Blends audio between the channels assigned to the left and right side of the crossfader.
The CF sends MIDI messages as well and it is assigned to move the Crossfader on VirtualDJ skin, however it will work in fake mode, so adjusting the Crossfader from VDJ skin will not affect the audio blending.


