


DDJ-SX3
EFFECT CONTROLS
The Single Effect mode offers one effect slot but more parameters controls per effect.
The Multi Effects mode offers 3 effect slots (to trigger more than 1 effect at the same time – chained effects).
The selection between Single and Multi FX modes is done via the VirtualDJ GUI
A 3rd mode, Sampler FX, is offered to apply VirtualDJ Effects to the Sampler Output. Note that there is no information on the default VirtualDJ GUI about the selected Effect on Sampler.
Single Effect mode
In this mode a single Effect is controlled with up to 6 Parameters and 2 Effect buttons. Only the first 2 Parameters are visible on the GUI. More Parameters and Effect buttons can be viewed in the FX GUI (opened from the + button on the GUI or using SHIFT+FX1 ON button on the DDJ-SX3)
- FX1 ON. Press this button to enable/disable the selected effect to the Left/Right selected deck.
Hold SHIFT down and then use this button, to open/close the FX GUI of the selected Effect on the right side of the Browser and view all the available Parameters and Buttons. - FX2 ON. Press this button to select the previous effect from VirtualDJ Effects list.
Hold SHIFT down and then use this button, to enable/disable the 1st FX button of the selected effect (if available). - FX3 ON. Press this button to select the next effect from VirtualDJ Effects list.
Hold SHIFT down and then use this button, to enable/disable the 2nd FX button of the selected effect (if available). - FX1 knob. Controls the 1st Parameter of the selected effect.
Hold SHIFT down to control the 4th Parameter of the selected effect (if available). - FX2 knob. Controls the 2nd Parameter of the selected effect.
Hold SHIFT down to control the 5th Parameter of the selected effect (if available). - FX3 knob. Controls the 3rd Parameter of the selected effect.
Hold SHIFT down to control the 6th Parameter of the selected effect (if available).
Multi Effects mode
In this mode 3 different Effects can be applied and controlled with up to 2 Parameters for each FX slot. Only the first Parameter is visible on the GUI (and the 2nd Parameter while SHIFT is held down on the DDJ-SX3). More Parameters and Effect buttons can be viewed in the FX GUI (opened from the + button on the GUI)
- FX1 ON. Press this button to enable/disable the selected effect of FX Slot 1.
Hold SHIFT down and press this button to select the next available effect for FX Slot 1. - FX2 ON. Press this button to enable/disable the selected effect of FX Slot 2.
Hold SHIFT down and press this button to select the next available effect for FX Slot 2. - FX3 ON. Press this button to enable/disable the selected effect of FX Slot 3.
Hold SHIFT down and press this button to select the next available effect for FX Slot 3. - FX1 knob. Controls the 1st Parameter of the selected effect of FX Slot 1.
Hold SHIFT down to control the 2nd Parameter of the selected effect of FX Slot 1. - FX2 knob. Controls the 1st Parameter of the selected effect of FX Slot 2.
Hold SHIFT down to control the 2nd Parameter of the selected effect of FX Slot 2. - FX3 knob. Controls the 1st Parameter of the selected effect of FX Slot 3.
Hold SHIFT down to control the 2nd Parameter of the selected effect of FX Slot 3.
Sampler Effect mode
Hold the CH1 FX ASSIGN button (44) for more than 1 second on either Left or Right side, to set the Left/Right FX unit to Sampler FX mode (led will blink)
In this mode a single Effect can be applied to the Sampler Output and up to 6 Parameters and 2 Effect buttons can be controlled. Note that the default GUI of VirtualDJ is not offering information about the selected Effect on Sampler, neither the status or its Parameters. You can either use a Custom Skin or hold the SLICER Pad mode button for more than 1 second to view the necessary information on the Pads section of the VirtualDJ GUI.
The operation of the FX Knobs and buttons is similar to the Single FX mode above
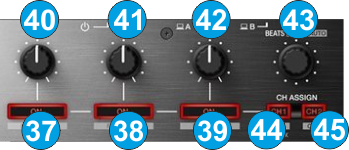
VIDEO EFFECT & VIDEO TRANSITION CONTROLS
- BEATS. (Left side - Video Transition Controls)
Use the left-side encoder to select a Video Transition.
Push the left encoder to trigger the selected Video Transition. The selected Video Transition will automatically apply when the Crossfader is moved from one side to the other and the AUTO or LINK Video Crossfader modes are enabled.
Hold SHIFT down and then use the left encoder to adjust the 1st Parameter of the selected Video Transition (if available). The Parameters of the selected Video Transition are not visible on the default VirtualDJ GUI.
Hold SHIFT down and then push the left encoder to open/close the FX GUI of the selected Video Transition at the right side of the Browser to view all of its Parameters (if available)
- BEATS. (Right side - Video Effect Controls)
Use the right-side encoder to select a Video Effect for the Master Video Output
Push the rightencoder to trigger the selected Video Effect.
Hold SHIFT down and then use the right encoder to adjust the 1st Parameter of the selected Video Effect (if available). The Parameters of the selected Video Effect are not visible on the default VirtualDJ GUI.
Hold SHIFT down and then push the right encoder to open/close the FX GUI of the selected Video Effect at the right side of the Browser to view all of its Parameters (if available)
OTHER FX CONTROLS
The CH ASSIGN buttons are mostly used to assign a VirtualDJ deck to a side of the Video Crossfader. If not manually assigned the selected Left and Right decks will be automatically assigned to the left/right side of the Video crossfader respectively.
- CH ASSIGN 1.
Use this button on the left side of the DDJ-SX3, to manually assign Deck 3 as left side of the Video Crossfader (LED will be lit). Press to disable manual assignment (LED will be off) and allow VirtualDJ to automatically assign the Left side of the Video Crossfader based on the Left selected Deck.
Use this button on the rightside of the DDJ-SX3, to manually assign Deck 2 as right side of the Video Crossfader (LED will be lit). Press to disable manual assignment (LED will be off) and allow VirtualDJ to automatically assign the Right side of the Video Crossfader based on the Right selected Deck.
Hold SHIFT down and then use the button on the left side of the DDJ-SX3 to enable/disable Auto Video Crossfader mode. When enabled, the Video Crossfader position will be smart positioned by VirtualDJ based on the Decks that are currently playing on air
Hold SHIFT down and then use the button on the right side of the DDJ-SX3 to enable/disable the 1st FX button of the selected Video Effect (if available)
Hold down this button for more than 1 second to set the Left/Right FX unit to Sampler mode (its led will blink). Repeat the procedure to set the FX unit back to the normal Simple/Multi FX mode. - ASSIGN 2.
Use this button on the left side of the DDJ-SX3, to manually assign Deck 1 as left side of the Video Crossfader (LED will be lit). Press to disable manual assignment (LED will be off) and allow VirtualDJ to automatically assign the Left side of the Video Crossfader based on the Left selected Deck.
Use this button on the rightside of the DDJ-SX3, to manually assign Deck 4 as right side of the Video Crossfader (LED will be lit). Press to disable manual assignment (LED will be off) and allow VirtualDJ to automatically assign the Right side of the Video Crossfader based on the Right selected Deck.
Hold SHIFT down and then use the button on the left side of the DDJ-SX3 to enable/disable Link Video Crossfader mode. When enabled, the Video Crossfader position will follow the one of the Audio Crossfader
Hold SHIFT down and then use the button on the right side of the DDJ-SX3 to enable/disable the 2nd FX button of the selected Video Effect (if available)